Sushi Without Seaweed (Ready in 10 Minutes)
Try sushi without seaweed for a delicious twist on traditional sushi rolls, especially if you don’t like nori! This recipe further simplifies the process by using fresh ingredients like mango, cucumber, and avocado.
Equipment
- Instant Pot
- Chef’s knife
- Cutting board
- Bamboo sushi mat
- Chopsticks
Ingredients
- 6-7 cups Instant Pot sushi rice (1 recipe)
- 1 mango (thinly sliced)
- 1 cucumber (julienned)
- 1 avocado (thinly sliced)
- Rice paper wraps (square)
For serving
- Sriracha mayo
- Toasted sesame seeds
Instructions
Sushi Rice
- Cook the sushi rice according to my Instant Pot sushi rice instructions. Set aside.
Fillings
- Peel and cut the mango into long, thin slices. Wash and cut the cucumber into matchstick-sized pieces. Cut the avocado in half, remove the pit, and slice thinly.
Assembly
- Wrap a bamboo sushi mat with plastic wrap or a large freezer bag. Place a piece of dry rice paper on top. Transfer ⅔ cup of sushi rice on top with a rice paddle.
- Wet your fingers in a small water bowl, then carefully spread the rice into a thin layer all the way to the edges, leaving about ½-inch at the top end.
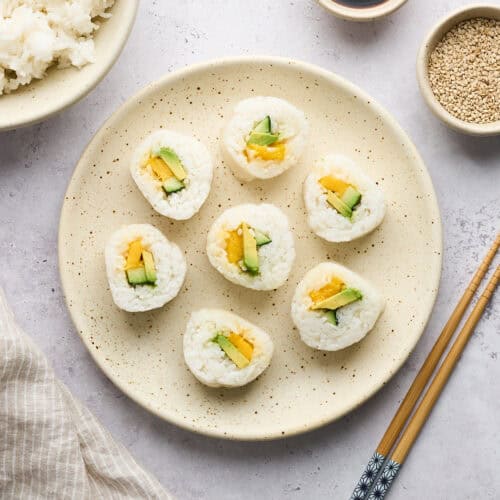
- Arrange mango, cucumber, and avocado slices in a line on top of the rice towards the bottom edge.
- Lift the bottom edge of the bamboo mat and roll the sushi mat over the fillings, pressing down all the way along the sushi roll (the pressure should be firm, but not so much that you squish everything).
- Pick up the tucked portion of the sushi mat and roll it a little further. Press down again, and repeat the same process until it is completely rolled.
- Wet the top edge of the rice paper with some water to help adhere it. Once the sushi is rolled, wet your fingers or a pastry brush and brush the outside of the roll with a little water to help soften the rice paper.
Serve
- Wet your knife with a damp towel to prevent sticking, then gently cut the roll into 8 pieces using long slicing motions.
- Serve immediately with soy sauce, spicy mayo, and sesame seeds. Happy eating!
Notes
Spreading the rice while it's still slightly warm makes it easier to handle and stick together better.
Keep the fillings neatly lined up and don’t overstuff it to make rolling easier.
Practice makes perfect! Don't worry if your first few rolls aren't 100% — it's all about trial and error here.
It’s MUCH easier to dampen the rice paper after rolling it. In my testing, I found it sticks way to easily to the makisu if you dampen it beforehand.
Wet an extra sharp knife with water to prevent the rice from sticking to the blade, making cutting through the sushi easier and cleaner.
Uniform slicing: When you’re preparing your fillings, aim for uniformly thin slices. This makes rolling easier and gives you a balanced mix of flavors in each bite.
Use a sharp knife: A sharp knife is essential for clean-cut sushi rolls. Wet your blade with water before cutting the roll to prevent sticking and achieve professional-looking slices.
Use a makisu: For the best shape, I recommend using a bamboo sushi mat. If you don’t have one, try a flexible placemat, parchment paper, or a sturdy tea towel.
Temperature matters: Let the cooked sushi rice cool until it’s only slightly warm. Hot rice will steam and wilt the fillings, affecting the texture and taste.
Nutritional information is a rough estimate and should not be taken as health advice.
Nutrition
Serving: 1roll | Calories: 277.2kcal | Carbohydrates: 51.9g | Protein: 5.3g | Fat: 5.5g | Saturated Fat: 0.8g | Polyunsaturated Fat: 0.8g | Monounsaturated Fat: 3.5g | Sodium: 13.8mg | Potassium: 308.7mg | Fiber: 5.2g | Sugar: 5.7g | Vitamin A: 458.2IU | Vitamin C: 17.5mg | Calcium: 18.9mg | Iron: 0.6mg
Don't miss another recipe!Subscribe to our newsletter!