Vegan Sourdough Bread
Enjoy this simple vegan sourdough bread that requires no kneading and delivers a deliciously rustic flavor. It’s perfect for beginner bakers, yielding a loaf that’s crusty on the outside yet tender on the inside. Serve a warm slice with toppings like vegan butter, jam, compote, avocado, or hummus.

Baking bread at home doesn’t have to be complicated! This vegan sourdough bread provides just that with its minimal ingredients and virtually all-hands-off approach. Like my dairy-free bread, it’s incredibly easy to prepare and turns out unbelievably delicious.
Why I love this recipe
This no-knead vegan sourdough bread recipe eliminates the need for labor-intensive kneading, making it ideal for busy parents, students, and beginner bakers. Plus, homemade bread costs a fraction of store-bought loaves.
You don’t even have to purchase commercial baker’s yeast, like for this whole wheat Italian bread and peasant bread. Instead, sourdough achieves its rising properties from fermented dough. How cool is that?!
Once baked, it has a characteristic tangy flavor, chewy texture, and excellent shelf life. Oh, and did I mention how proud you’ll feel once you catch your first glimpse of the final loaf? There is nothing more satisfying than baking bread at home!
“This was my first time ever baking sourdough or bread even, and it came out BEAUTIFUL and DELICIOUS!! Great recipe Thank You!!” — KAREN
Add your review >
Ingredient notes
You only need 4 ingredients to make a vegan sourdough bread recipe, and they’re all pantry staples! Find a full breakdown and suitable substitutes below.
Sourdough starter
The sourdough starter brings the natural yeast and bacteria necessary for fermenting the bread, contributing to its characteristic tangy flavor and fluffy texture. If you don’t have a sourdough starter, you can purchase a sourdough starter online, make your own, or ask a friend to give you some extra.
Water
Water hydrates the flour, activating the gluten and helping the dough develop the right consistency. It also affects the fermentation speed of the dough.
Substitute: You can substitute water with equal parts unsweetened plant milk. This will slightly sweeten the bread and give it a softer texture.
Flour
I use whole wheat and unbleached all-purpose flour to create a chewy yet tender texture with a crispy crust. For chewier bread, use a higher ratio of whole wheat flour. For a softer texture, use more all-purpose flour.
Sea salt
Sea salt enhances all the flavors in the bread and controls yeast activity, preventing over-fermentation. It also strengthens the gluten network.
Substitute: Kosher salt can be used in the same quantity, but it’s less dense, so you may need to adjust the amount. Kosher salt dissolves more quickly and distributes more evenly in the dough.
For a complete ingredient list and step-by-step guide, scroll down to the recipe card.
How to make
Learn the best way to make vegan sourdough bread with my straightforward, easy-to-follow instructions. Look for the tips in green throughout this section for consistent and successful results!
Preparation
To begin, remove your sourdough starter from the fridge for at least an hour before starting the bread-making process. It will become more active during this time, which is essential for a good rise.

Cooking
Step 1
In a large mixing bowl, combine the water and sourdough starter. Stir until well mixed, then gradually add in the mixed flours and sea salt, combining to form a rough dough.
You can add any optional add-ins at this point, like seeds or olives.

Step 2
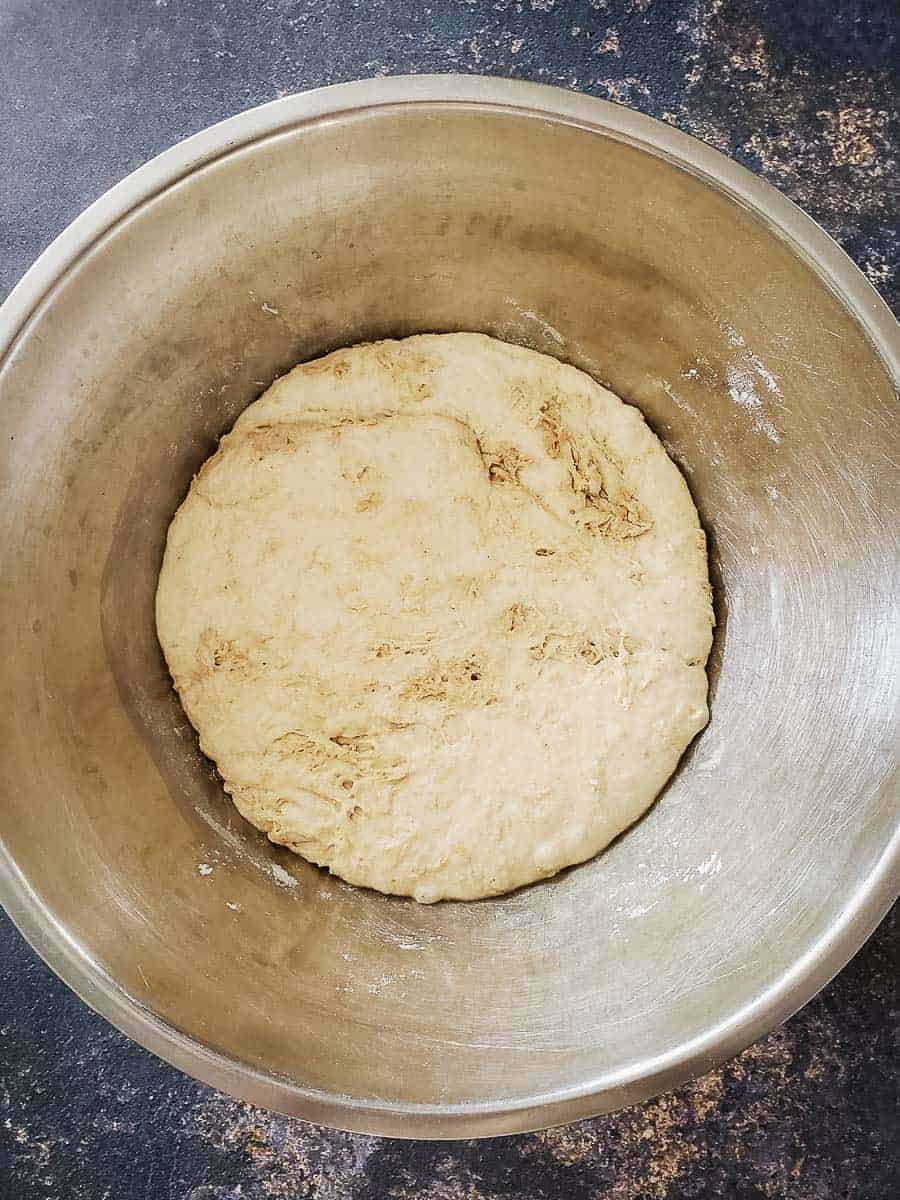
Once your dough has formed, cover the bowl with a damp cloth, plastic wrap, or large plastic bag and let it sit at room temperature. The dough should rise for about 18-22 hours, ideally overnight.
The time it takes for your dough to rise will vary depending on your climate. As a general guideline, it should almost double in size. I will typically start my bread around 3 p.m. the day before baking it, then let it rise overnight.

Step 3
Once the dough has risen enough, sprinkle some flour on top of it and on your palms. Take a portion of dough from the bottom and stretch and fold it over itself. Rotate the bowl and repeat this process 5 or 6 times.
The stretching and folding technique strengthens the dough’s structure and distributes the gases and nutrients for the yeast, promoting a more even rise and airy crumb.


Step 4
Shape the dough into a round loaf and place it into a well-floured proofing basket or a bowl lined with parchment paper. Let it rise again for about 2-3 hours until it visibly puffs up.
A second rise helps the dough to achieve its final structure and size. This is also a good time to preheat your oven.

Step 5
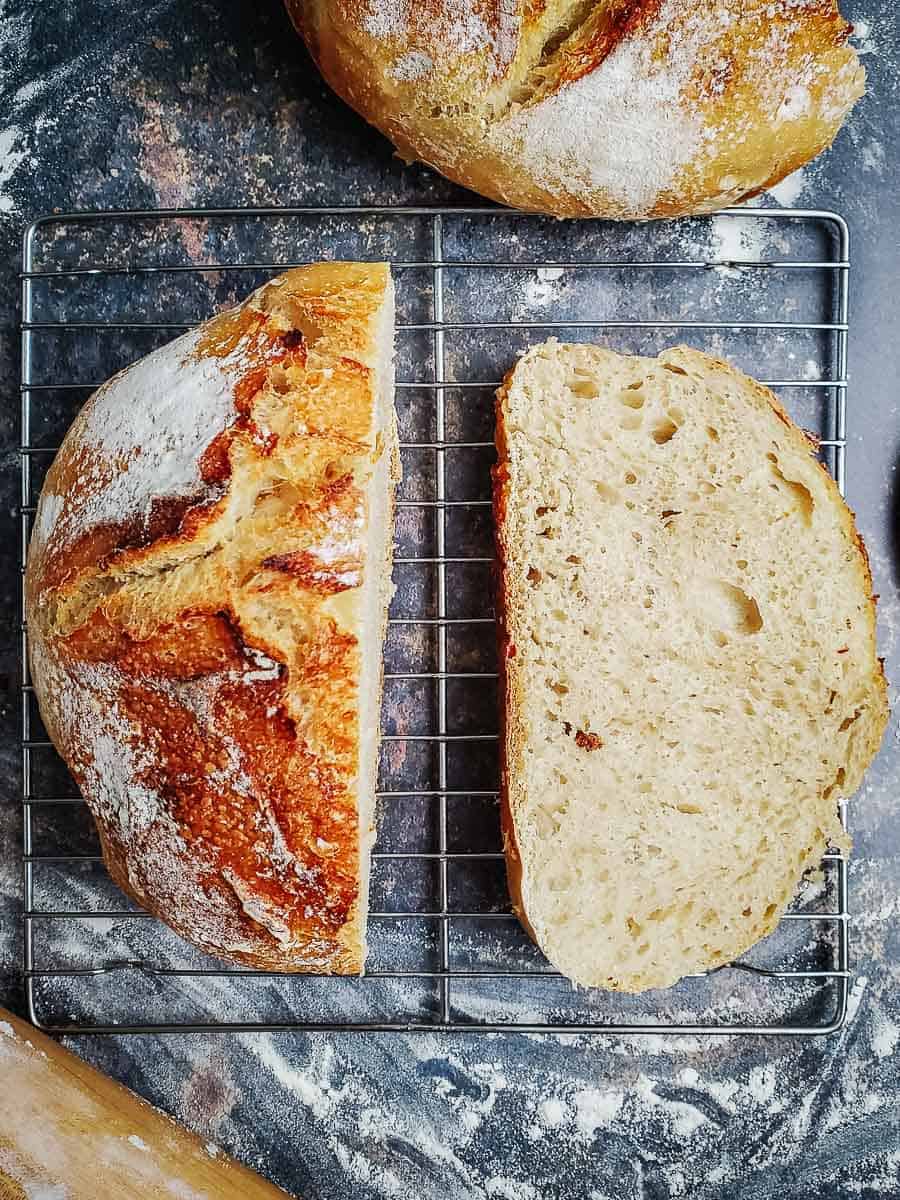
Preheat the oven to 450 degrees Fahrenheit with a Dutch oven inside. Transfer the dough to the hot Dutch oven, scoring the top with a sharp knife or sourdough bread lame. Sprinkle the top with extra flour, then place it in the oven.
Scoring the dough helps it rise uniformly and adds an artisanal, rustic touch.

Step 6
Bake the loaf with the lid on for 35 minutes, then remove it and bake it for another 15-20 minutes until the top is golden brown. Allow your vegan sourdough bread to cool completely on a wire rack before slicing it. Happy eating!

Expert tip
There aren’t many ingredients in vegan sourdough bread, so the steps will make or break your recipe. The most important part is ensuring your starter is active.
You can check your sourdough starter by dropping a small spoonful into a glass of water. If it floats, it’s full of air bubbles and active enough for baking. If it sinks, it might need more time to ferment or be fed again to increase activity.
An active sourdough starter will also show tons of bubbles on the surface and throughout the mixture, which is a sign of yeast activity and fermentation. It should double in size within 6-8 hours after feeding it.
Last but not least, smell your starter. It should have a slightly tangy aroma that’s not overly sour. An off-smelling or foul odor usually indicates that the starter has been contaminated or gone bad.
Serving suggestions
There are so many ways to use vegan sourdough bread, but one of my favorites is a warm slice with vegan butter. For a sweet pairing, try strawberry compote, blueberry compote, and almond or peanut butter.
You can also toast slices and add guacamole, avocado crema, homemade hummus, vegan cream cheese, bruschetta, or salsa fresca. Or, pair a slice or a sourdough sandwich with soups and stews like vegan minestrone soup, chickpea soup, and vegan white bean chili.
Cooking tips
Use a scale: Weigh your ingredients, especially the flour and water, rather than measuring by volume to get precise and consistent results every time.
Mind the proofing time: Over- or under-proofing can ruin your bread. Rather than strictly adhering to the clock, watch for signs that the dough is ready for baking, like doubling in size and having a slightly domed shape.
Be gentle with the dough: Be gentle when you’re folding and stretching the dough to preserve its airy structure.
Cooling: Allow the bread to cool completely on a wire rack before slicing it. Cutting into bread too early can cause a gummy texture since the bread continues to cook from residual heat.

Frequently asked questions
Yes, you can make this vegan sourdough bread recipe without a Dutch oven. Use a heavy, oven-safe pot with a tight-fitting lid or a casserole dish with a cover.
If your dough is too sticky, add a little more flour. However, be careful not to add too much since this can result in a dry loaf.
There are many reasons why your loaf may not be rising. Some of the most common reasons are an inactive sourdough starter, incorrect measurements, or insufficient rising time.
You can prepare the dough and let it rise for the first time before refrigerating it for up to 3 days. Allow the dough to come to room temperature before moving on to the rest of the recipe.
Storing & reheating
If you have leftover vegan sourdough bread or are making a double batch, you can easily store it for later. Let the loaf cool to room temperature before storing it.
Fridge
Store the cooled sourdough bread loaf in a breadbox or wrapped in a clean towel at room temperature for up to 3-4 days.
Freezer
To freeze, wrap the loaf in plastic wrap and place it in a freezer-safe bag where it will last for up to 3 months. Thaw the loaf at room temperature before eating again.
Reheating
To refresh the crust, reheat the loaf in an oven at 350 degrees Fahrenheit for about 5-10 minutes. Alternatively, heat it in a toaster oven for 3-4 minutes until browned.
More bread recipes


Hungry for more?
If you enjoyed this recipe, please consider leaving a star rating and a comment down below! Your feedback not only helps others discover our blog but also gives us valuable insights from your experience.
Don’t forget to subscribe to our newsletter for the latest recipes, and check out our shop for our top kitchen recommendations. Thank you for supporting BBV!
Recipe

Easy Vegan Sourdough Bread
Equipment
- Dutch oven
- Large bowl
- Parchment paper
- Sharp knife or bread lame
Ingredients
- ¼ cup active sourdough starter
- 1 ½ cups water
- ½ cup soft whole wheat flour
- ½ cup whole wheat flour
- 2 ½ cups all-purpose flour (or white bread flour)
- 1 ½ teaspoons sea salt
Instructions
- Remove your sourdough starter from the fridge for at least an hour before starting the bread-making process.
- Once the starter is warm, mix it with water and salt in a large mixing bowl. Add the flour and any optional add-ins, like seeds or olives. Mix everything until the dough is well combined.
- Cover the bowl with plastic wrap or a large plastic bag and let the dough rise at room temperature for 18-22 hours until it doubles in size. I typically start the bread around 3 p.m. the day before baking and leave it overnight.
- Once the dough has risen enough, sprinkle some flour on top of it and your hands. Take a portion of dough from the bottom to stretch and fold it about 5 or 6 times.
- Form the dough into a ball, transfer it to a flour-lined bread-proofing basket or parchment-lined bowl that’s about the same size as the Dutch oven you’ll bake it in, and let it rise again for another 2-3 hours.
- Preheat the oven to 450°F. While it’s heating, place a Dutch oven inside to warm it up as well.
- Transfer the dough to the hot Dutch oven, and score the top with a sharp knife or sourdough bread lame to allow steam to escape. Sprinkle the top with additional flour before placing it in the oven.
- Bake the sourdough bread with the lid on for 35 minutes, then remove the lid and bake it for another 15-20 minutes until the top is golden brown. Allow the loaf to cool completely on a wire rack before slicing it. Happy eating!
Notes
Nutrition
Note: I’ve updated this post to include new information and helpful tips about the recipe.

Justine Drosdovech is a food writer, photographer, and one of the founders of Broke Bank Vegan. She is a self-taught plant-based chef but uses her healthcare background to craft dishes that are both delicious and nourishing.
Hiii! I’m new to the sourdough making world! I made this recipe 2x previously, the first time was a fail but the second time it was SO tasty! I just tried for the 3rd time following the directions to a T, and don’t know what went wrong. It looked great, but after the first rise (20hrs) it was HUGE, until I started to fold it. It was incredibly wet and sticky and the air pockets all deflated, despite being gentle. I added some extra flour in the stretching/folding process but then it didn’t rise at all for the second rise. Do I need more flour initially, or did I maybe let the first rise go to long?? I’m not sure how to troubleshoot 🙂
Hi Gabi!
We’re happy to hear it worked out the second time, but it sounds like it rose for too long on the third try. Since your specific climate and time of year has an effect on the proofing times, it’s better to go off what the dough looks like rather than specific times. Once it doubles in size, it’s ready to move to the next step. Hopefully that helps you, and we hope the next batch works!
This was my first time ever baking sourdough or bread even and it came out BEAUTIFUL and DELICIOUS!! Great recipe Thank You!!
Hi Karen,
That’s amazing to hear! We’re so happy it worked out for you. Thanks for letting us know!